MetaMask Explained
What is MetaMask, How Does it Work, and How do You Use it?
MetaMask is an Ethereum web browser extension that acts as an Ethereum wallet and an interface for Ethereum-based dApps.[1][2][3][4]
In other words, MetaMask allows users to store Ethereum related data like public addresses and private keys like any other Ethereum wallet (i.e. you can hold your tokens on there), and it allows users to interact with websites running Ethereum-based apps and smart contracts (i.e. it turns your web browser into an Ethereum browser).
The bottomline being that MetaMask allows users to do anything Ethereum related (like interact with smart contracts, send/store/receive Ether, or interface with Ethereum-based web apps) just by running a simple browser extension.
The benefit is that this avoids users having to run all the Ethereum software themselves (MetaMask runs that for you on their servers).
We explain how to install and use MetaMask below. First, it’ll be helpful to watch the official video below from MetaMask.
Setting custom gas with tokens: You may need to adjust the gas price (your fee paid to miners) when sending tokens. The suggested gas price has been absurdly high a few times for me with MetaMask (even taking into account that some tokens need more gas to send). A good practice is to go to EtherScan.io, find what people are currently paying to send the token you want to send, and then setting the gas price and gas limit to that.
TIP: With MetaMask you have to approve every action you take. So if you want to interact with a smart contract, make sure to go to the MetaMask screen and hit verify to sign off on the action.
Quick MetaMask Guide: Download the extension, create a wallet, write down your seed phrase, send some ETH to that wallet, go to a website that hosts a dApp like IDEX, use Metamask to interact with the smart contracts on the site.
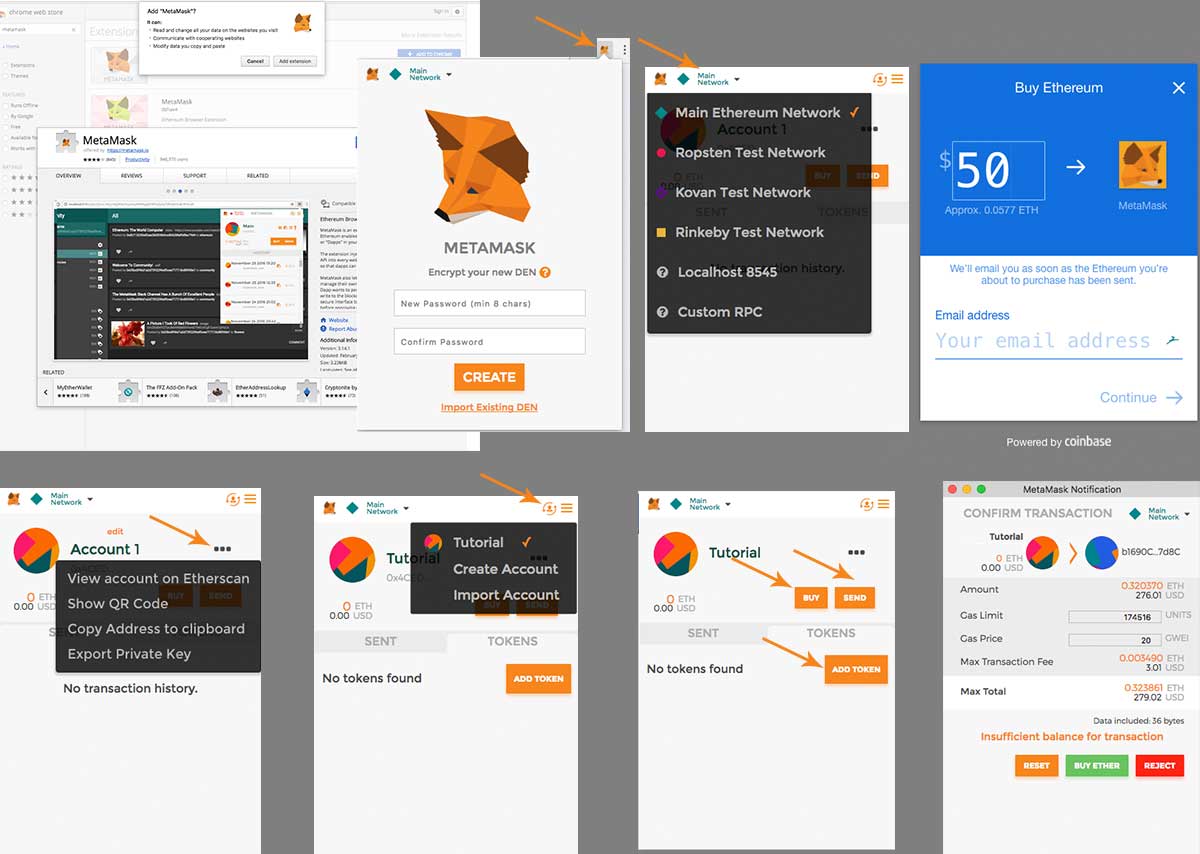
MetaMask Introduction.Summary of how to install and use MetaMask: If you download the MetaMask Chrome extension, create a vault, and then fund an address associated with an account you are ready to use any website that uses Ethereum-based apps or smart contracts. Essentially then, it boils down to install MetaMask and follow the on-screen directions. It all seems more complicated than it is if you are new to the world of cryptocurrency. However, the whole thing is almost self explanatory once you start using it. See the video below or the image at the top of the page for a visual, see the directions below for a walk through if you need the extra explanations to help you wrap your head around how this all works.
TIP: When you create your MetaMask password for the first time, it creates a “vault” or “account vault.” This vault stores your accounts. Each account has a public address and private key associated with it. These are standard Ethereum addresses that you can export to other wallets.
FACT: MetaMask allows users to sign smart contracts and interface with Ethereum dApps (distributed Ethereum-based applications) without running a full Ethereum node. In short this means you don’t have to download the Ethereum blockchain to use the Ethereum network, which is good, because the blockchain file is huge.
How to Install and Use MetaMask – the Simple Version
First let’s start with a simple MetaMask how-to that assumes you can figure out some basic steps on your own (see the detailed how-to below for the nitty gritty):
- Install MetaMask. Go to metamask.io and select “get Chrome extension” (or the extension for whatever browser they support and you wish to use). Follow the directions. Make sure to create a strong password and keep your password and recovery seed somewhere safe. A default account with an associated public Ethereum address will be created on the Main Network. You can use that account, or you can add accounts by clicking the circular looking button in the top right corner of MetaMask. Each account as one associated address.
- Send some Ether to MetaMask. For example, go into your Coinbase account and send it to an address associated with an account created in MetaMask. To get your public address that was automatically created when you created your MetaMask vault, click the “…” icon and click “copy address to clipboard.” That will copy your address to your clipboard so you can paste it.
- Go to the site you want to use. Each site designed to interface with Ethereum is going to preform a different function. For this example we’ll use CryptoKitties, but we could just as easily be going to EtherDelta to trade tokens, be going to a token’s onsite exchange, or be interfacing with a smart contract via a website. For our CryptoKitties example, the first step will be to create a CryptoKitties account by clicking “start meow.” Notice how at this point the site has grabbed some information from your MetaMask wallet (in this case, your public address)? This is because MetaMask and the Ethereum-based web app are talking to each other. Continue to follow the directions for signing in.
- After you sign in you’ll then get a popup screen in MetaMask that confirms your sign in (essentially from here out each step you do on the site is confirmed via MetaMask). Click “sign in” and you are now logged for real and ready to buy internet things using internet money. This works just like it would on any other website, click the product, click the buy now button, confirm the transaction. The only note is that your final confirmation will be in MetaMask (you’ll see a screen that confirms details like fees).
- Now wait. Your transaction needs to be recorded on the blockchain before you actually get your whatever it is you just bought (in this case, your CryptoKitty).
- Now you own this thing you bought. Once the transaction is confirmed, your address will be associated with the token you just bought. If you bought a kitty, it is associated with a non-fungible ERC721 token (which represents a cat which you can view/sell on the site). If you bought a cryptocurrency, your address is now associated with a balance of a specific ERC20 token. If you bought some other type of non-standardized Ethereum-based token asset, then it is that. Essentially, once your transaction is recorded on the blockchain, you own whatever it is you bought.
TIP: You need to pay “gas” to buy things with Ether. So you need more Ether in your wallet than you want to spend.
How to Install and Use MetaMask – the Complete Version
To start using MetaMask, you’ll need to install the MetaMask extension on a web browser.
You can choose from Chrome, Firefox, Opera, or Brave. For this tutorial we’ll use the Chrome browser as an example.
To install MetaMask, go to metamask.io and select “get Chrome extension.”
Once at the MetaMask page on the Chrome store on chrome.google.com click “add to Chrome,” read the popup text, and then confirm you want to add the extension.
Once it finishes downloading, you will have the MetaMask extension installed (you can tell it is installed by the little fox logo in the top right corner of your Chrome browser).
TIP: You can view your extensions in Chrome by clicking on Window > Extensions using the Nav bar at the top of the screen in Chrome. This will allow to enable and disable MetaMask.
Click the MetaMask fox logo to get started using MetaMask.
The first thing you’ll need to do is read the privacy warnings and accept the terms and conditions. In short, the warning says you’ll want to log out of MetaMask when you aren’t using it and only log in when you are on a site you want to use MetaMask on (because MetaMask can talk to websites and they can talk back essentially).
Create a new MetaMask vault (where you’ll store accounts which store Ethereum addresses) by creating a strong password (for future reference, you can also restore an existing vault at this step as well).
The next screen will give you a backup code (a recovery seed) so you can restore your account if you ever lose the password.
TIP: Try Googling “strong password generator.” If you use an online password generator, change the password before using it. Make sure to keep your password and seed somewhere safe and not connected to the internet.
Now you are logged in and ready to party (AKA you now have a public Ethereum address and private key created, are ready to send/receive Ether via that address, and are generally ready to use MetaMask; you can create additional accounts in your vault by clicking on the circle looking icon in the top right of the MetaMask screen and clicking “create account”).
TIP: To see your public address, click the “…” icon and pick “copy address to clipboard” (that will copy it to your clipboard so you can paste it). To get your private key, click “export private key.” If you do export your private key, make sure to keep it somewhere safe and offline. You can also view your address on Etherscan via the “…” icon and get a QR code (which makes it easy for people to send you Ether by scanning the code).
TIP: When on the MetaMask screen, notice that you can click the words next to the fox logo on the top left corner. It should say Main Network by default. This means you are on the Main Ethereum Network, the mainnet (as opposed to a test network or testnet). You can switch between Test Networks, a local Ethereum node, the Main Ethereum Network, and other choices here. We want the Main Network (the Main Ethereum Network); the default choice.
Now that you are setup and ready to use MetaMask, you need to add some Ether to your wallet. You can use any platform you currently have Ether on to send to any address in any of your MetaMask accounts. If you don’t have Ether, you can buy some Ether will Coinbase by clicking the “buy” button in MetaMask or by buying Ether in Coinbase and then sending to an address MetaMask created.
Once you have Ether, you are ready to roll. You can now use any web-based platform that that wanted you to have MetaMask installed that you weren’t using because you were like “what is Mist / MetaMask / Parity / etc.”
The only note here is that every website is different. In general they are all going to require interacting with smart contracts, but exactly how this works will differ by site. Are you using EtherDelta to trade tokens? Are you using CryptoKitties to buy digital cats? Clearly each process is going to be a little different, but luckily once you have MetaMask the rest is fairly easy to figure out.
See the citations below for different MetaMask walkthroughs.
- MetaMask. MetaMask.io.
- Calling a Smart Contract With a Button. Medium.com.
- Using MetaMask (dapp for chrome) with EtherDelta (decentralized exchange). Steemit.com.
- How to use MetaMask. CryptoCompare.com.
Author: Thomas DeMichele
Thomas DeMichele has been working in the cryptocurrency information space since 2015 when CryptocurrencyFacts.com was created. He has contributed to MakerDAO, Alpha Bot (the number one crypto bot on Discord),...
Thomas DeMichele's Full Bio